Cross Post with Kirk Roerig (@mrpossoms)
Week of Awesome II # Kirk#
On August 24th, a second annual game development competition was posted on gamedev.net. Like many game jams, it followed pretty standard rules.
- Adhere to the theme
- No development may begin before the start of the competition
- Complete your project within the 7 day competition period.
Garrett Hoofman approached me about competing shortly after it was announced on gdn. I said yes, and Garrett began preparing an empty project for the jam.
On the night of the competition the theme was announced: ‘The Toys are Alive.’ Initially, we were struggling to come up with a decent idea. After a night of milling it over we reached a decent concept.
The game would be set in a childhood bedroom occupied by two brothers. Obviously, being children, they were constantly at each other’s throats. So what better way to settle such sibling rivalry than an all-out brawl between toy armies?
Concept # Kirk#
The gameplay would be similar to a Battlefield game, but with button-mashing beat-em-up mechanics. The room would be laid out in such a way that a toy chest is positioned at the foot of each brother’s bed. The players and AI would spawn out of these chests as the toy militia.
Each force would have a block castle erected on the floor. They would have to defend their own castle and capture the other team’s without running out of reinforcements.
Division of Labor # Kirk#
As the member of OPifex who has more experience with generating art assets, I took the lead on character creation, level design and art, UI, sound effects and graphic effect programming.
This left Garrett to focus on game logic and implementation, collision response, creating a voxel render and design of the codebase in general.
For the most part, we did a decent job at keeping our attentions fixed on our tasks respectively. There was a little bit of crossover by each of us, but it was minimal.
Project Technologies and Tools # Kirk#
Game Engine: OPengine (In house)
Level Editor: Magica Voxel
Digital Painting: ProCreate + Adonit Jot Touch 4 (iPad), Gimp
Programming Language: C/C++ (minimal C++)
IDEs and Text editors: Visual Studio Pro 2013, Sublime Text 2
Audio Recording and Editing: Audacity
Build System: Cmake
Version Control: Mercurial
For the last couple of years, Garrett and I have been developing a multiplatform data-oriented game engine. Since developing a fully-functional game engine is a daunting task, we use each game jam as a chance to discover bugs, design flaws and missing features.
Our engine is minimal and does not include a native level or scene data structure. This allows us to structure ’levels’ in whatever way we see fit. In this case, I found an awesome voxel modeling program called Magica Voxel. The program could export into many different formats, so I assumed at least one of them would work for us.
ProCreate is an awesome iPad app that closely resembles Adobe’s PhotoShop for digital painting. It also features highly customizable brushes. By default it’s meant for high fidelity painting, but I was convinced it would work for drawing sprites and pixel art. At my day job, I work for a company called Adonit, which specializes in designing and building high-end styluses for creatives. I used one in conjuction with ProCreate for pressure sensitivity. Gimp was used to convert PSDs from ProCreate into PNGs, which were then stitched into an OPSS (OPifex sprite sheet), which is consumable by our engine using a tool written by Garrett.
Our game engine is written in C but compiled with a C++ compiler to take advantage of sugar such as operator overloads - which makes math related game development much cleaner. As a Windows fan, Garrett used Visual Studio to do much of his coding. I, on the other hand, am a UNIX fanboy, so I used Sublime Text and g++.
For recording and editing sound effects, I used Audacity. I will not claim to be a foley artist, so free and simple is exactly what I was looking for (it’s also what I’ve used in virtually all of my other game development experiences, so familiarity may have played a factor). I should note here that I’m not responsible for Ultimate Bro-Down’s music; that would be the talented Matt Javanshir’s doing.
Our game engine is built to use Cmake as its build system. This lends itself well to multiple platforms, not only for the runtime but also for development. For example: on Windows, Cmake generates a Visual Studio project, but on OSX or Linux, makefiles are generated instead.
Game Art on an iPad # Kirk#
In the past, I’ve always painted art assets on a computer using a Wacom Tablet and GIMP or Photoshop. This time I wanted to try somthing new. Thanks to Adonit, I now had access to an iPad Air and a pressure sensitive stylus.
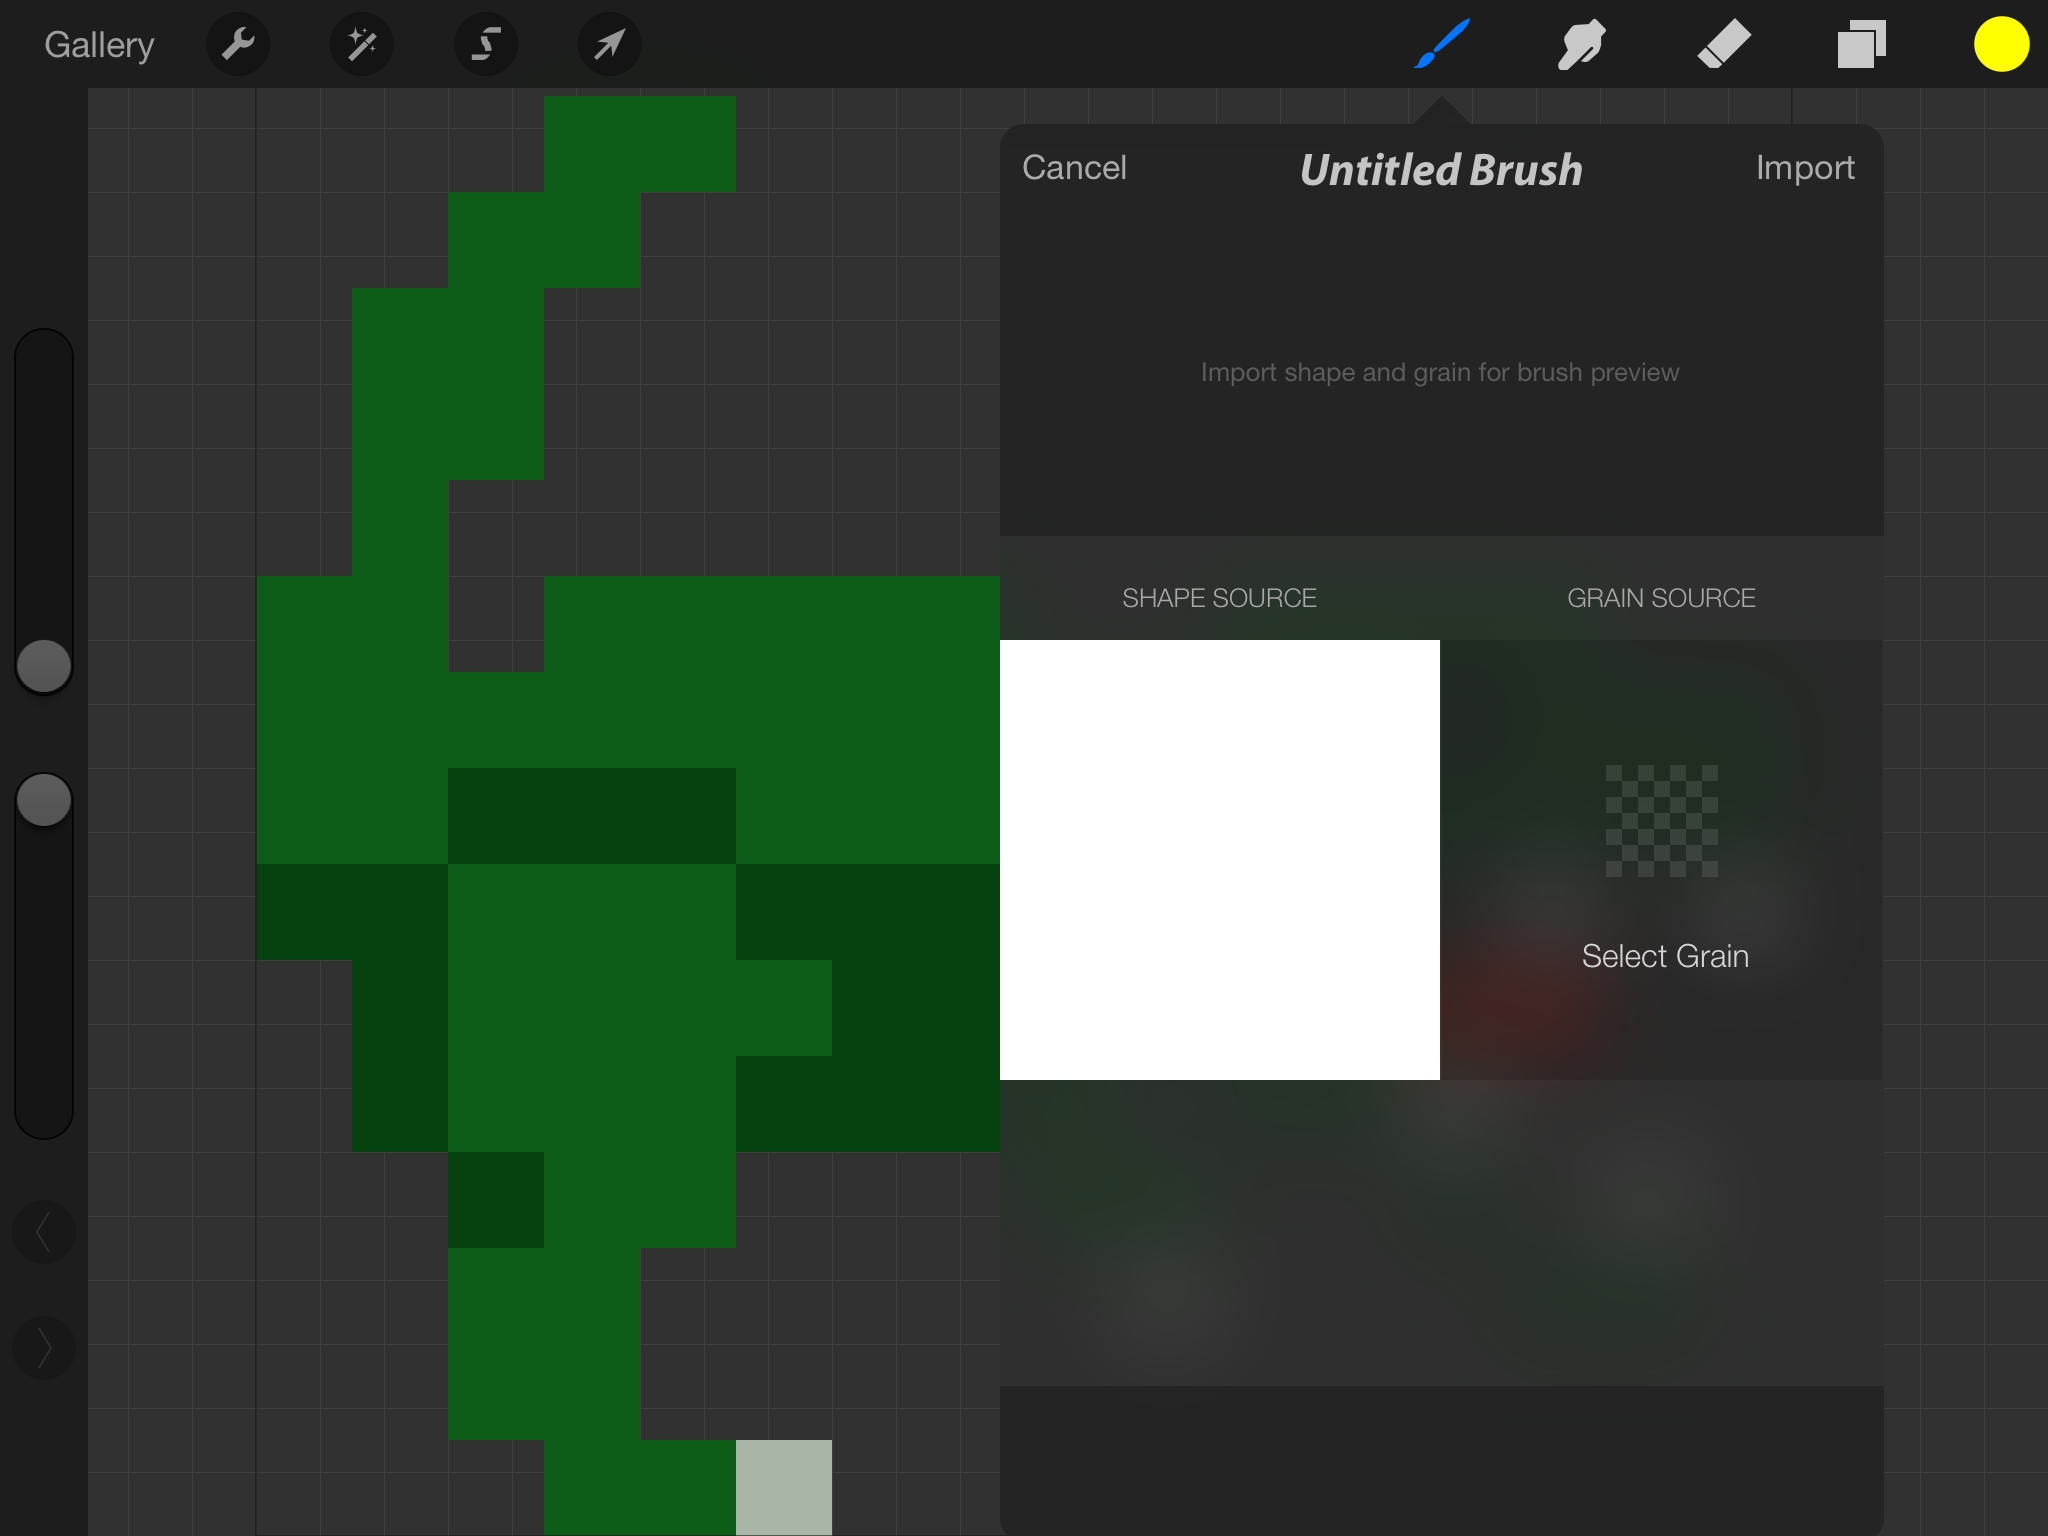
I had already downloaded ProCreate for digital illustration and used it a fair amount, so I was pretty comfortable with it. As I mentioned above, I still had to create brushes which would allow me to paint pixel art style sprites.
It actually turned out to be very simple. All I had to do was select a blank source texture and a blank grain for the brush.\
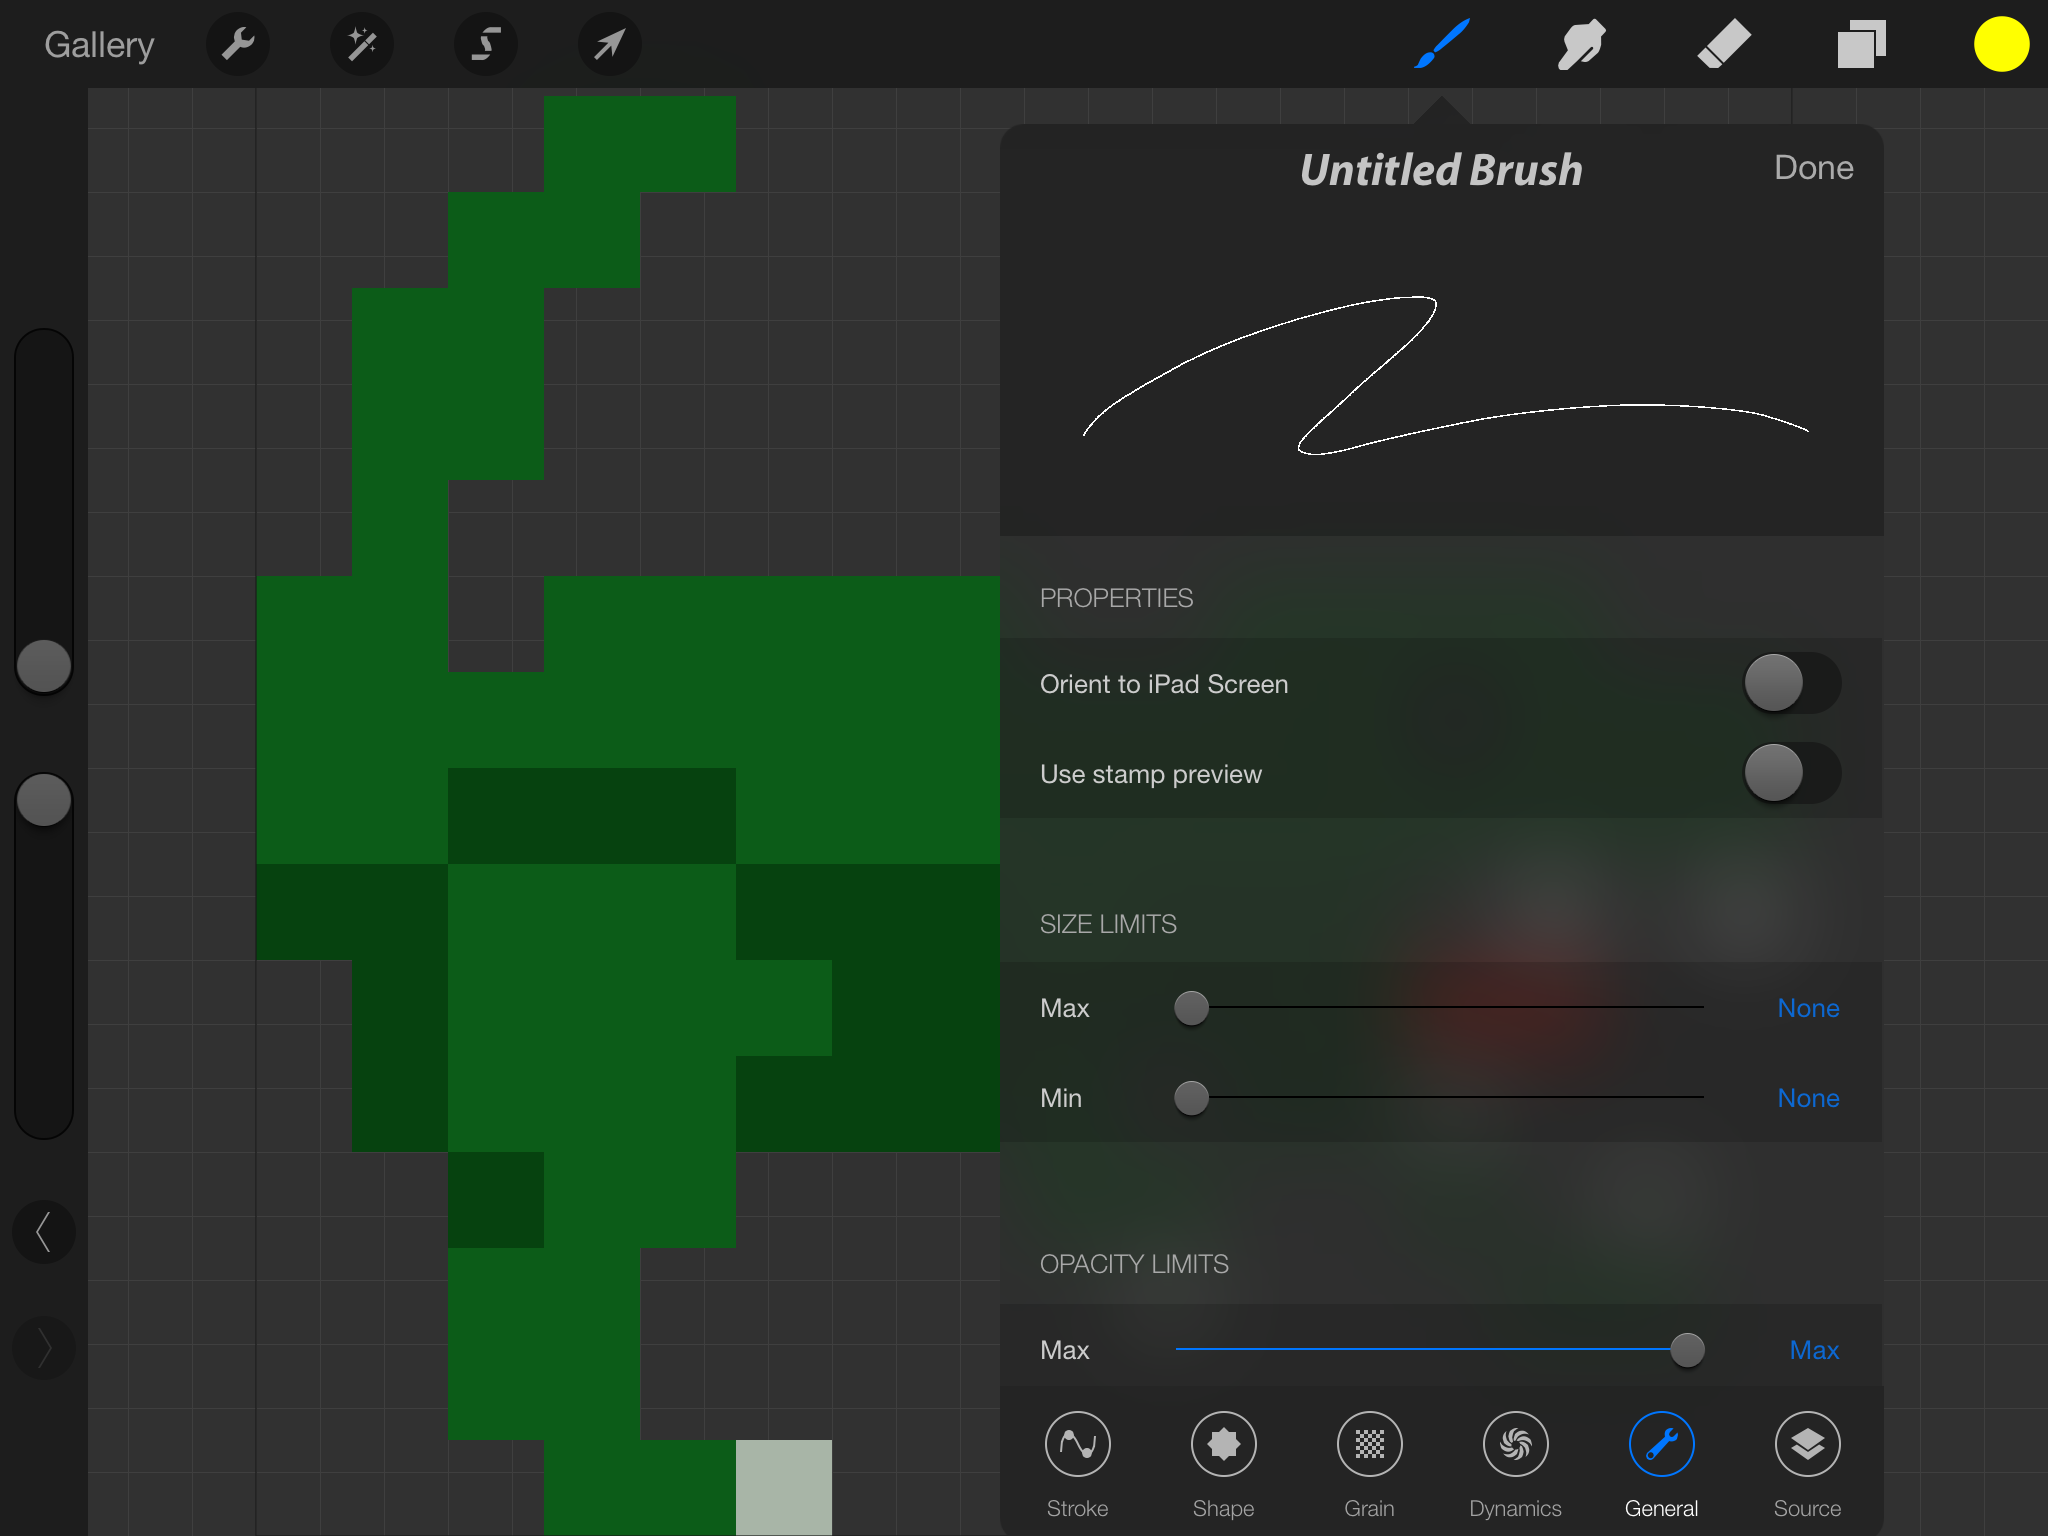
After that, I set the size limits to their lowest settings. Which ends up being a single pixel! Perfect!\
When you start a new project in ProCreate, you can key in the dimensions of the canvas you’d like to work with. For the character sprites, I manually entered 16x16, and 32x32 for the environment.
The one thing that was a little strange at first was that I could only seem to successfully export my work using DropBox (I’m not a regular DropBox user). It ended up being beneficial, since both Garrett and I could access the exported sprites immediately.
Using Magica Voxel # Kirk#
This was the first voxel-based game that Garrett or I had ever made. So for level design, rendering, and logic, it was totally foreign ground for both of us. As a result, I had to find a decent tool to create our level with; I also had to write an OPengine asset loader that could consume a file format that Magica Voxel could export.
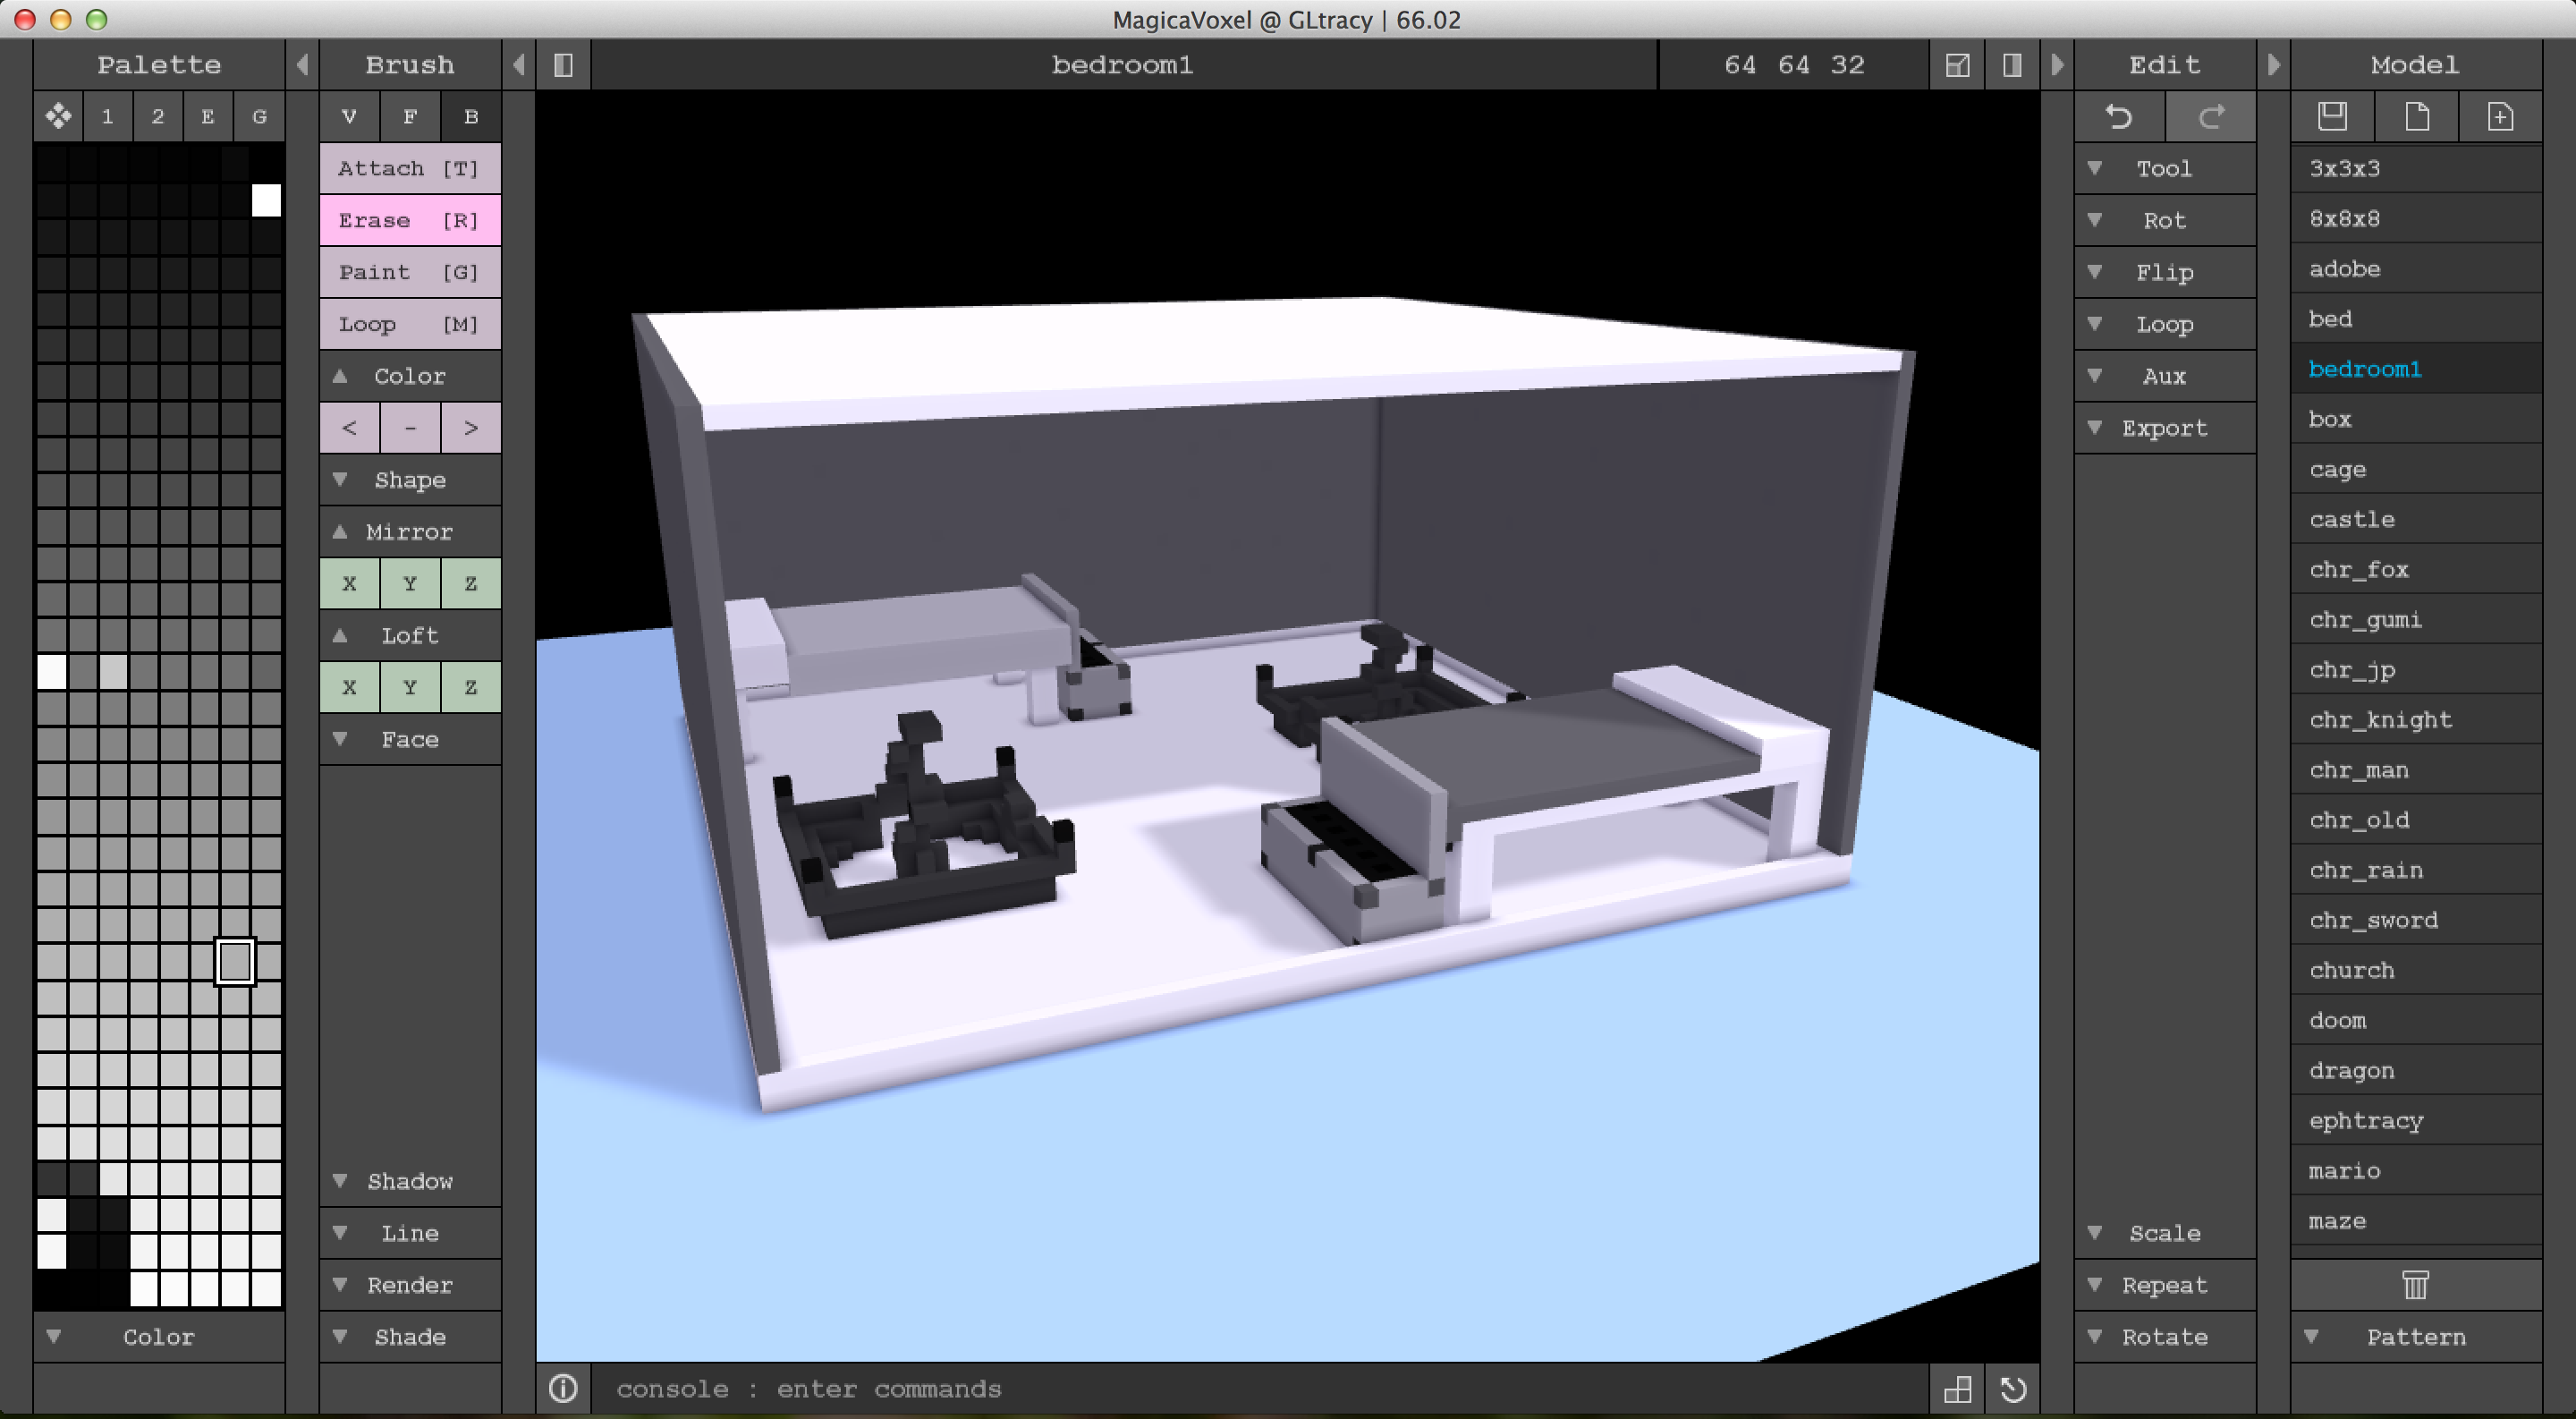
Using Magica Voxel was actually pretty enjoyable. The interface is stark, and requires a bit of exploration in order to figure out how to use it, but once you do it’s quite powerful. For camera controls, you can toggle between an FPS style camera and one that orbits the model. For creating the level, I found the FPS style camera much more useful.
Modeling is performed by ‘attaching’ and ’erasing’ voxels which can then later be painted. You can attach large cuboids at a time by clicking one voxel, and dragging to another one to define two opposite points. The volume defined is then filled.
Modeling the level was fairly easy. We defined different block types by using grayscale colors to indicate block types. Then I had to write the code to load the level itself into our game. Magica Voxel could export into several file formats. I needed a format that included volume data, so I (rather arbitrarily) settled on Qubicle’s interchange format .qb which is ‘defined’ here.
After trying to implement my own loader code, I discovered that the file spec wasn’t telling the entire truth. In the spec, volumes are broken down into header information and matrices. The matrices are the volume itself. When exporting from Magica Voxel, my file was resulting in two matrices: one named ‘PAL’ and another named ‘Bedroom1.’ I can only assume that the ‘PAL’ matrix contained the color pallet used by the volume; however, the format for it was not described anywere. This could be thanks to Magica Voxel. Regardless, the level matrix contained all the color data we needed stored as 4 byte tuples. So all I had to do was ignore the first matrix, and everything loaded smoothly.
Here’s what the loader looks like.
#include "./include/Utilities/LevelLoader.h"
#include "./Pipeline/Engine.h"

#define READ32 *(ui32*)OPread(str, sizeof(ui32))

OPchar* LevelSprites[256];

OPint levelLoad(const OPchar* path, void** levelAsset)
{
    OPstream* str = OPreadFile(path);
    OPlog("levelLoad() - Entered loading %s", path);

    if(!str){
        OPlog("levelLoad() - Error opening file");
        return 0;
    }

    // read the header
    ui32 version       = READ32;
    ui32 colorFormat   = READ32;
    ui32 zOrientation  = READ32;
    ui32 compressed    = READ32;
    ui32 visibilityMsk = READ32;
    ui32 matrixCount   = READ32;

    OPlog("\tVersion: %u\n\tColor Frmt: %u\n\tZ ori: %u\n\tCompressed: %u\n\tVis Msk: %u\n\tMat count: %u\n",
        version,
        colorFormat,
        zOrientation,
        compressed,
        visibilityMsk,
        matrixCount
    );

    ui32* colors = NULL;
    ui16* voxels = NULL;

    ui32 width;
    ui32 height;
    ui32 depth;

    for(OPint i = 0; i < matrixCount; ++i) {
        OPchar len = *OPread(str, sizeof(ui8));
        i8* name = (i8*)OPalloc(len + 1);
        OPmemcpy(name, OPread(str, len), len);
        name[len] = '\0';

        //OPlog("\n\tMatrix(%u) - %s", i, name);
        OPfree(name);

        width  = READ32;
        height = READ32;
        depth  = READ32;

        ui32 x, y, z;
        x = READ32, y = READ32, z = READ32;

        // allocate and assign the data to the appropriate pointer
        if(!i) {
            colors = (ui32*)OPalloc(sizeof(ui32) * width * depth * height);
        }
        else {
            voxels = (ui16*)OPalloc(sizeof(ui16) * width * depth * height);
            Level level = {
                width,
                height,
                depth,
                voxels
             };
             *levelAsset = (Level*)OPalloc(sizeof(Level));
             OPmemcpy(*levelAsset, &level, sizeof(Level));
        }

        // read voxel data
        for(int zi = 0; zi < depth; ++zi){
            for(int yi = 0; yi < height; ++yi){
                for(int xi = 0; xi < width; ++xi){
                    ui32 data = READ32;

                    if(!i){
                        colors[xi + yi * width + (depth - 1 - zi) * width * height] = data;
                    }
                    else{
                        voxels[xi + yi * width + width * height * (depth - 1 - zi)] = 0x00FF & ((ui8*)&data)[0];
                    }
                }
            }
        }
    }

    OPfree(colors);
    OPstreamDestroy(str);

    return 1;
}

OPassetLoader* getLevelLoader()
{
    static OPassetLoader loader = {
        ".qb",
        "Voxel/",
        sizeof(ui16*),
        levelLoad,
        NULL,
        NULL
    };

    return &loader;
}
Creating Graphical Effects # Kirk#
We wanted the game to feel like a hectic brawl between two toy armies (since that’s what it is). When I first thought about it, I envisioned scenes from Braveheart… but with fewer people and more toys.
Particles # Kirk#
Since we were not going for realistic graphics, I felt that particles would do the best job illustrating chaos. This meant I would use particles to indicate movement and damage. To fit the non-realistic look of the sprites and level, I decided that most of the particles should be animated using hand drawn frame-based animations. This way I could give the particles more character.
For each step made by a character, an animated dust puff would erupt from the ground (indicating that the character’s foot scuffed along the ground). In addition, there would be a small chance that a large, barely visible dust cloud would spawn. These clouds would last 5 seconds each. So characters moving in a group would create a giant cloud of dust (like armies on a battlefield). Here’s an example of the dust being kicked up from the character’s feet.\

When a character was hit, they would emit a puff of dust that expanded away from their center (so you could tell when a character was taking damage). Here’s a blown up example of the impact dust.\

After I implemented the dust puff in the game, I realized it wasn’t quite pronounced enough to make it obvious that a toy took damage. To try to solve that problem, I added star-shaped particles that were projected in all directions after an impact. This did a slightly better job of portraying what happened.
Toy Gibs # Kirk#
I wanted to implement a method of destroying toys by making them break into pieces. At first glance, it may seem like breaking toys into pieces and scattering them about the level would be a problem for the particle system. However, in addition to sending toy shrapnel flying, I also wanted the delapitated parts to remain on the floor. This meant that they would have to have some knowledge of the level’s structure. So instead of bastardizing the particle, I built a smaller system that performed a similar task, but took into account the level’s volume data when determining the state of the toy gibs.
The dynamics of the gibs were simple. I wanted to spawn them with an initial upward velocity. Have them scatter, fall to the ground and stop moving. To achieve this, I took a rather simplistic approach in simulating the gibs.
    // update the gut data
    for(OPint i = TOY_GUT_COUNT; i--;){
        struct ToyGut* gut = TOY_GUTS + i;

        // check to see if the gut's motion has stopped, bypass it if it has
        if(!OPmemcmp(&gut->verts[0].velocity, &OPvec3Zero, sizeof(OPvec3)))
            continue;

        // Update all 6 verts
        OPint dead = 0;
        for(OPint j = 6; j--;){
            struct ToyGutVertex* vert = gut->verts + j;

            if(vert->velocity.y < 0 && GetBlockTypeAt(vert->position.x, vert->position.y - 0.5f, vert->position.z)){
                dead = 1;
            }

            vert->velocity += G * dt;
            vert->position += vert->velocity * dt;
        }

        if(dead){
            // remove the velocity from all corners
            for(OPint j = 6; j--;){
                gut->verts[j].position.y = ((OPint)gut->verts[j].position.y) + 0.1f;
                OPmemcpy(&gut->verts[j].velocity, (OPvec3*)&OPvec3Zero, sizeof(OPvec3));
            }
        }
    }
This code achieves all the dynamics that I mentioned above. It simply iterates over all the vertices that collectively make up the gibs and then accelerates them by gravity toward the ground. When the gib is moving downward, and it is found to be in a non-empty voxel then its velocity is set to zero. When the velocity of a gib is zero, it is omitted on the update. This check is performed at the OPmemcmp() call. This function compares chunks of memory for equality. In this case, it is used to compare a zero vector with the velocity; if they are equivalent, then the function returns zero, and the update for that gib is skipped.
You may notice that for each gib 6 iterations are performed. This is because the data being operated on is actually the same as what is passed on to the video card (3 per tri, 2 tris per quad). This is not exactly optimal. The reason for it is design change. Initally, I had planned on running the gibs dynamics simulation on the GPU. However, part-way into the implementation, I realized that I still needed to transfer the volume data to the video card. I could have created a 3D vertex texture and used that to determine intersections, but since 3D textures are completely un-implemented in our engine I decided against it.
Lighting # Kirk#
Since the game world is voxel-based, I figured some lighting was nesessary to keep the level visually interesting (and to help distinguish similarly textured blocks from each other). Initially I implemented simple directional diffuse lighting. However, that alone did not seem adequate.
What we really needed was a better way of defining the corners and edges of features in the level. I figured the best way to go about it was to implement a simple pre-computed ambient occlusion. That way, corners which are flanked by blocks are shaded a bit darker, with the effect becoming more extreme with an increased number of neighbors. Here’s an example of the outcome.
This was a very simple and naive approach. For each face of a voxel, the surrounding eight volume coordinates are sampled. If one of the voxels is filled, the shadow term for the face’s vertex is multiplied by some coefficent that is less than one. This can repeat for each occluding neighbor for a darker shadow.
This simple approach did the trick. However, improvements could still be made. Widening the sampling radius would produce softer shadows that extend from the corners across multiple voxels. Another thing that is missing are shadows from diffuse lighting. This could be implemented easily just by checking the distance to the nearest block above a given face, and using that distance to shade it accordingly.
Voxel Rendering # Garrett#
We decided early on that our game level would be done using voxels. It would help keep the simple, pixellated art style that we were aiming for with the toys and still be a simple process.
I wanted to get things up and running as quickly as possible so that we could start to get a feel for the direction of the game. With that in mind I started with the dumbest/fastest way possible to get voxels into our game.
Dumb Way #1#
A voxel level, in its simplest form, is just a three-dimensional array of numbers. Each number indicates what type of block it is.
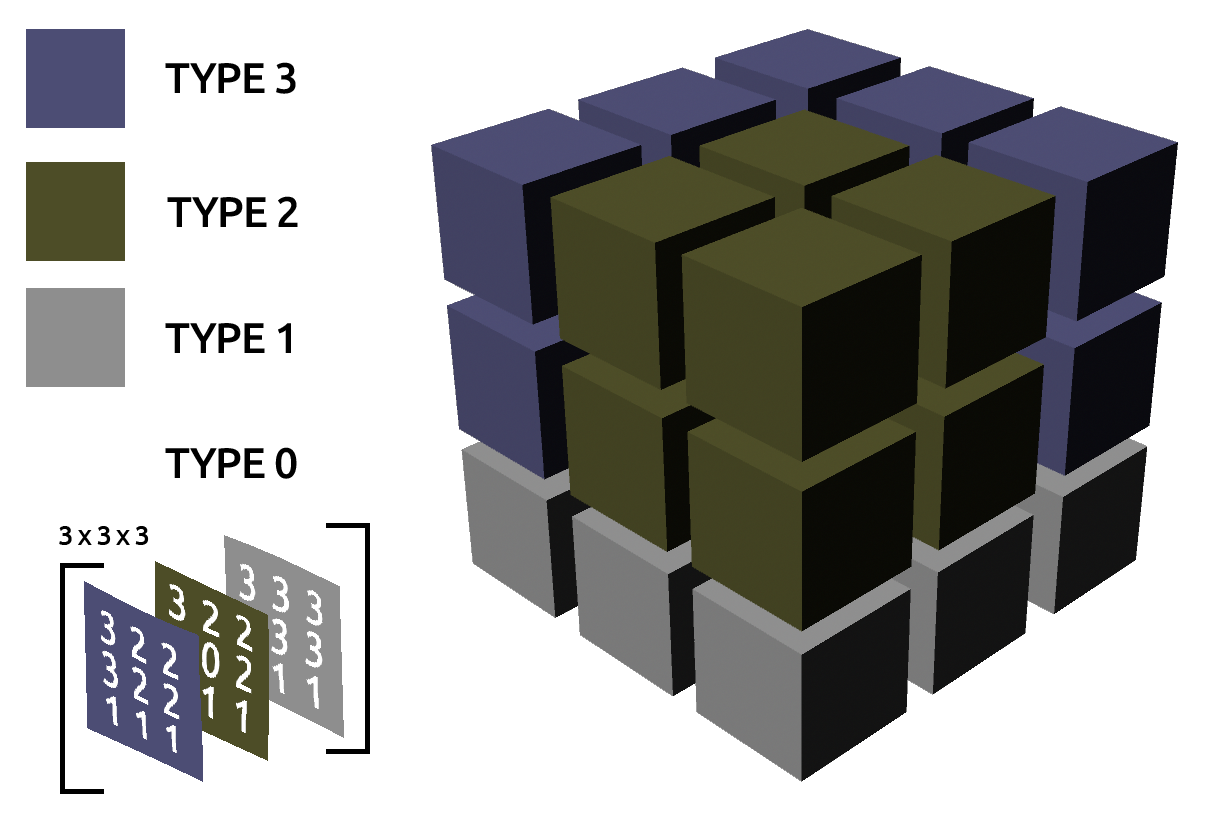
To render a voxel to the screen I needed a box-shaped mesh to represent it. I created a simple box in Blender, centered it at [0,0,0], and then exported it into our own OPifex Model format (.opm).
With a mesh loaded into the game, I began looping through each dimension of our voxel array (x, y, and z). At each voxel, I set the color in the shader that represented the voxel type (based on the number) in the voxel array. If the voxel type was 0 it indicated an empty voxel, and wasn’t drawn out. Otherwise, the mesh would then get translated to the appropriate position and rendered out, like the image above.
This method is the worst possible way to do voxel-based rendering. It causes whd draw calls. So a 3x3x3 level (which is tiny) creates 27 draw calls per frame. Unacceptable.
Dumb Way #2#
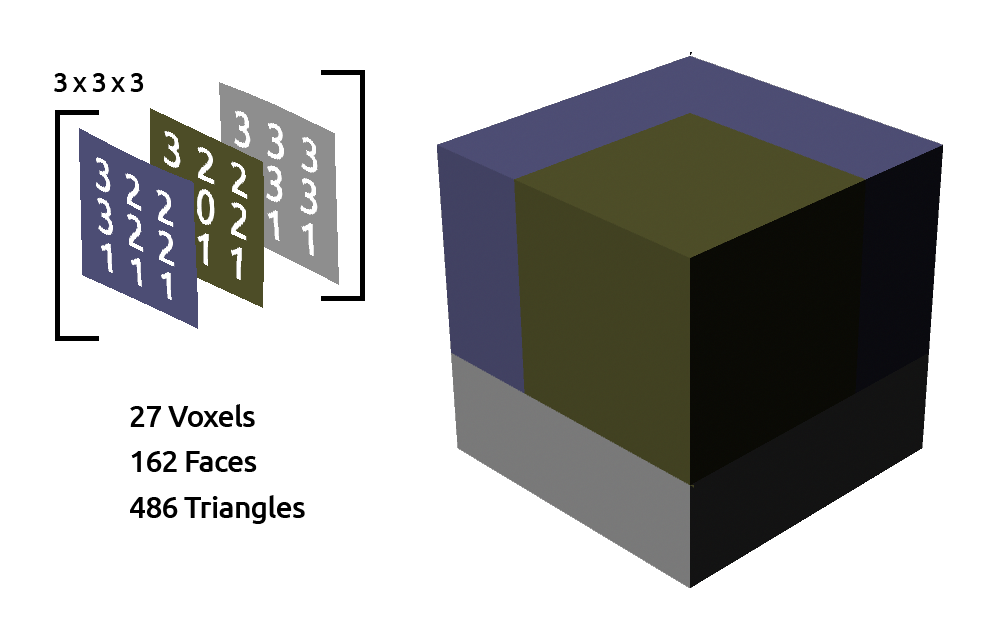
To reduce the number of draw calls, I needed to convert all of the voxels into a single mesh which would then only take a single draw call per frame.
To create the mesh, I looped through each of the voxels and added their vertices and indices into a collective list. The respective lists were then used to create one vertex and one index buffer to render out the level.
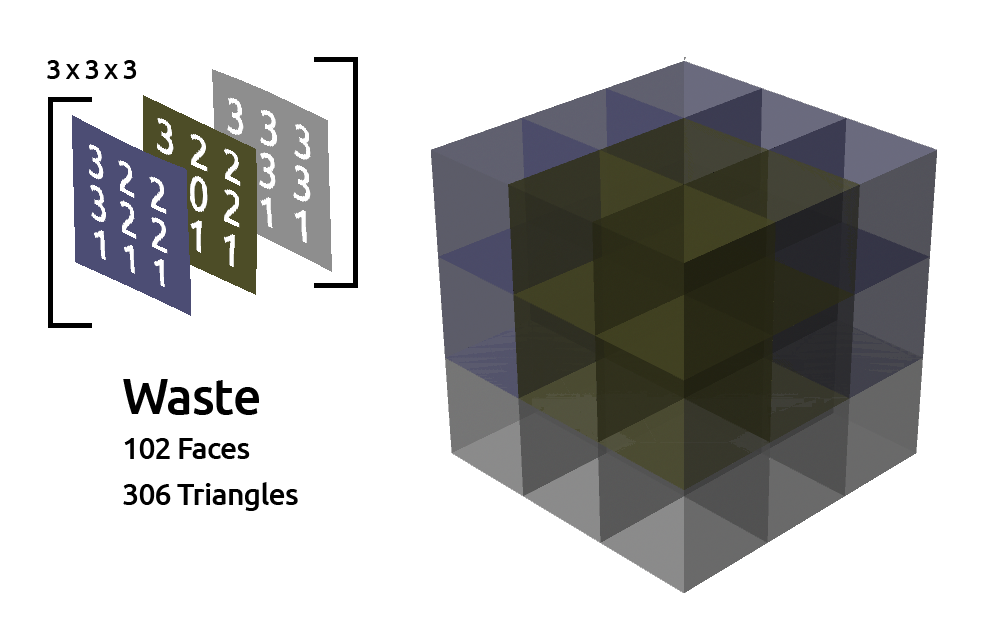
This helped with the number of draw calls but we still had a lot of extra faces. A large portion of the faces being added would never be seen because they were being blocked by another voxel.
Smarter Way #1#
In order to reduce the number of faces present on the final mesh, I did a simple check with the voxel next to it.
For example, if I were to check the voxel at [0,0,0] I could check the voxel to its right at [1,0,0]. If the voxel at [1,0,0] was of any type other than 0, then I would not add the faces. If it was a type of 0, meaning an empty block, it would be visible to the player so I would add the faces.
Optimizing the end mesh dramatically reduced the number of faces that needed to be drawn.
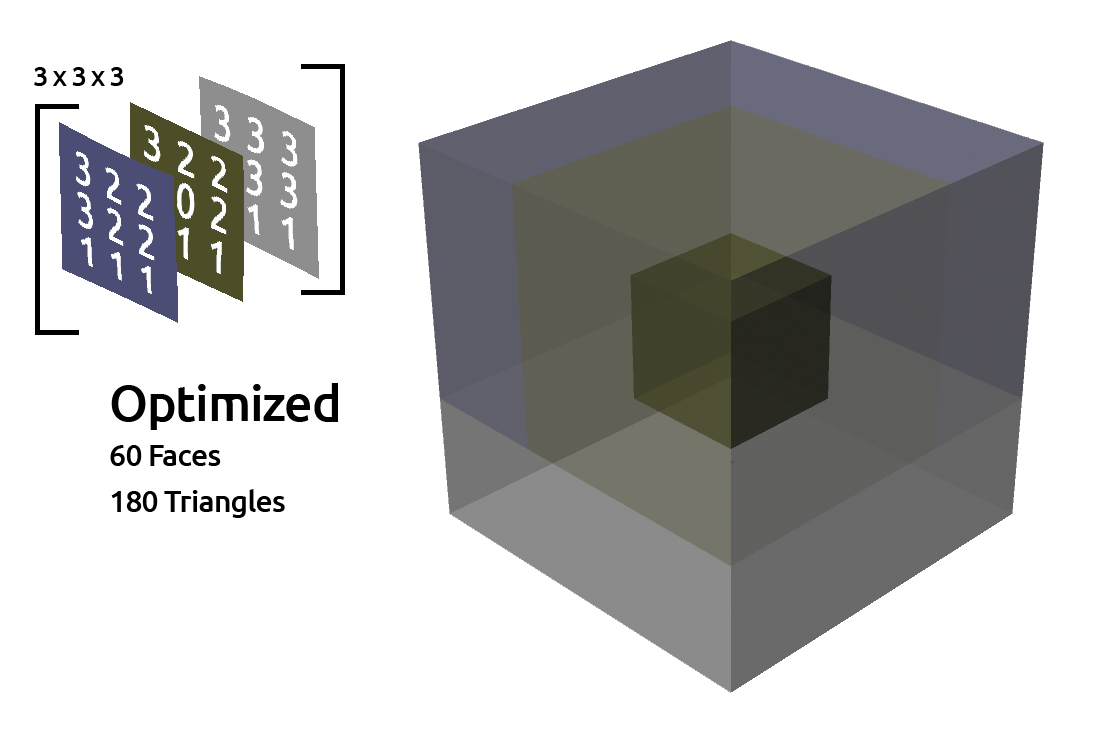
The center voxel is marked as empty, so each of the sides are added.
Since our camera always points down the +z-axis, I was able to make a further optimization: all of the back faces (those pointing down the -z-axis) were removed, reducing the number of polygons even further.
Potential Changes#
This was just the start of potential optimizations that could have been done to our voxel mesh. There are lots of algorithms than can merge voxel faces of the same type together to get an even further reduction of faces.
Since this was the first time we introduced voxel drawing into the OPifex engine and we were in the middle of the jam, I decided not to go down that road and be happy with the reduction we had.
Sprite Sheets # Garrett#
To create the sprite sheets for the game, we used our own web tool: http://tools.teamopifex.com
To create an OPifex Sprite Sheet (.opss) we saved out each sprite as an individual image with the filename format of [filename]_[frame].png.
Example: BearMove _0.png, BearMove _1.png
Once we had all of these small images with the appropriate names, I started up the tool and imported all of the images into the web tool. The tool is a modified version of Stitches (http://draeton.github.io/stitches/) which works to ‘stitch’ all of the images together. It’s been modified to then re-size the full image to a power of 2 and then save the result out into our own sprite sheet format file.
Loading Character stats # Garrett#
When loading the toys into the game, we wanted an easy way to modify and tweak them while we continued development. The OPifex engine makes it very easy to create a custom resource loader.
The below is an example of our gijoe.chr file.
Name = GI Joe
Idle = Toys/gijoeidle
Move = Toys/gijoemove
Hit = Toys/gijoehit
HitMove = Toys/gijoehitmove
Block = Toys/gijoeblock
HP = 3
Size = 2
Mass = 1
Accel = 1.2
Decel = 0.4
Jump = 12
AttackDmg = 1
JumpDmg = 1
AttackRange = 15
ReloadRate = 100
MaxSpeed = 5
The best part of using a file format resource for our characters (aside from not compiling the stats into the game) is the ability for hot-swapping.
The OPifex engine will detect file changes of resources that have been loaded and then automatically reload them. That means we can be in the game, tweak the .chr definition and it will immediately take effect in the game. It makes it much easier and faster to debug, tweak, and enhance the game stats.
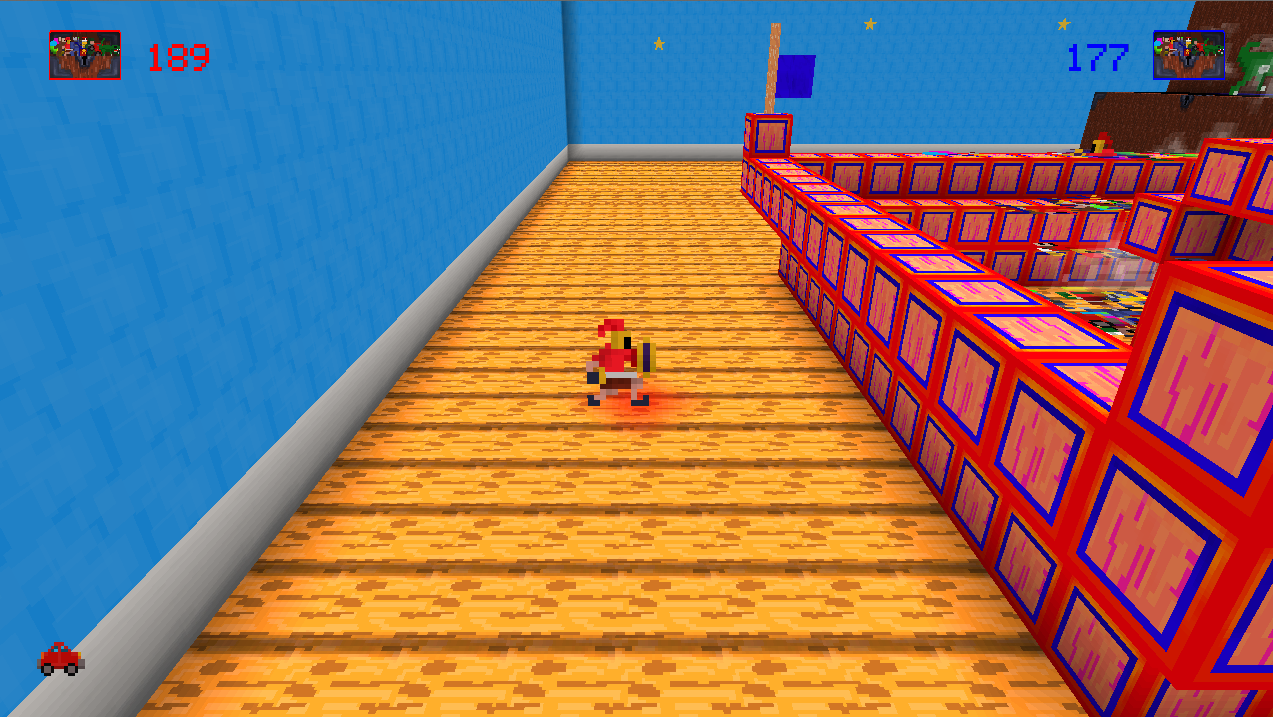
The Result # Garrett#
After a week of game development binging, constant caffeine/alcohol intake, and messed up sleeping patterns we created Ultimate Bro-Down. It was an incredibly fun week, and one that we’ll probably repeat next year.
Future Plans # Garrett#
We would like to continue development of the game with an end goal of getting it on the Ouya platform. There’s lots to do with tweaking effects and stats, cleaning up code, and adding/improving features.
So keep an eye out for Ultimate Bro-Down 2.0!
Follow us on the twitters!
Kirk Roerig - @mrpossoms
Garrett Hoofman - @gambitsunob